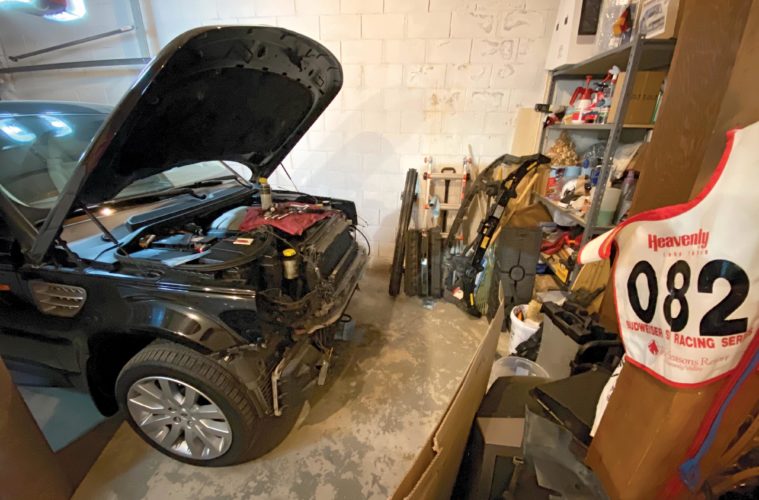
This technical guide shows you how to replace the supercharger intercooler radiator (highlighted in the above illustration). This method does not require you to evacuate the A/C system and drain the entire cooling system, as suggested in the Land Rover factory workshop manual. Tips: Place the vehicle into off-road height and use safety stands if needed. Take your time, place every bolt, part and nut into labeled plastic bags for reassembly.
Suggested Tools
- Phillips, Flat Screwdrivers
- 1/4”, 3/8” Socket drivers, w/extensions, various sized sockets, swivel
- 1/4” Drive Torx Bit set
- Safety Glasses
- Pliers, Locking Pliers
Tech Tip
If your dashboard reads “Low Coolant Level”, chances are the float inside the expansion tank is saturated with coolant. Replacing the sensor won’t fix it, you will need to replace the overflow tank and float with new Genuine Land Rover factory parts available direct from Rovers North.
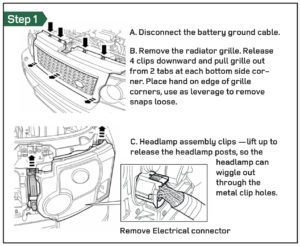
Step 1 – Remove Grille, Headlamp Assembly (left and right)
- A. Disconnect the battery ground cable.
- B. Remove the radiator grille.
WARNING: For vehicles fitted with Xenon headlamps, the following precautions must be observed. Ensure the headlamps are switched off at all times. Never switch on the lamps or test the bulbs with the lamp holder released from the headlamp. Failure to comply may result in exposure to ultraviolet rays, severe electric shock, burns, or the risk of explosion.
Eye and hand protection must be worn. CAUTION: Always protect paintwork and glass when removing exterior components.
- C. Remove the headlamp assembly (left and right). Release the headlamp assembly clips. Disconnect the electrical connector.
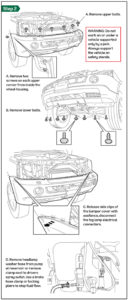
Step 2 – Remove Front Bumper Cover
- A. Remove front bumper cover upper fixings, 8 total.
- B. Remove front bumper cover lower fixings, 4 Torx bolts, and 4 screws.
- C. With assistance, release the front cover from the sides. Release the clips and disconnect the two electrical connectors from each fog lamp.
- D. Remove headlamp washer hose from either pump or bumper.
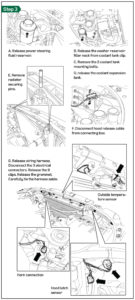
Step 3 – Prepare for Hood Latch Panel removal
- A. Release the power steering fluid reservoir and move it aside. Release clip.
- B. Release the washer reservoir filler neck from the coolant tank clip.
- C. Remove the 2 coolant expansion tank mounting bolts.
- D. Release the coolant expansion tank, lift the coolant expansion tank vertically.
- E. Remove the radiator securing pegs.
- F. Disconnect hood release cable from the connecting box.
- G. Release the wiring harness. Disconnect the 3 electrical connectors. Release the 9 clips. Release the grommet. Carefully tie the harness aside.
Step 4 – Hood Latch Panel removal
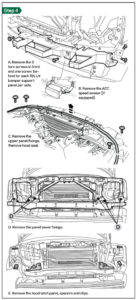
- A. Remove the 3 Torx screws. Remove the one screw behind for RH, LH bumper support on corner. Repeat the above procedure for the other side.
- B. Remove the ACC speed control sensor (if option equipped). Remove the 4 Torx bolts. Disconnect the electrical connector.
- C. Remove the panel upper fixings. Release the hood seal. Remove the 4 Torx bolts.
- D. Remove the panel lower fixings. Remove the 6 Torx bolts.
- E. With assistance, remove the hood latch panel. Mark the fitted position, remove the 6 spacers. Remove the 2 clips.
Step 5 – Remove bumper support, air ducting
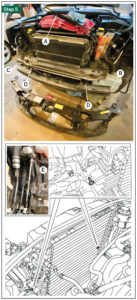
- A. Release the finned power steering fluid cooler, set it aside on top of the engine.
- B. Remove the steel bumper support. Remove 2 bolts on LH (driver’s) side that attach the washer reservoir to the bumper support and secure.
- C. Remove SRS sensor on RH (passenger) side behind bumper support and remove 2 oil cooler air duct bolts.
- D. Remove 8 bolts that secure bumper support to body/chassis.
- E. Release the bumper air ducting. Remove the two screws using a long extension with a swivel end socket worked the best (see inset photo).
Step 6 – Remove supercharger intercooler radiator
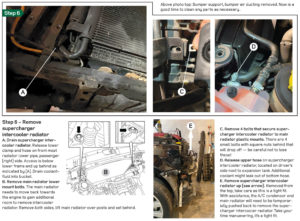
- A. Drain supercharger intercooler radiator. Release lower clamp and hose on front most radiator lower pipe, passenger (right) side. Access is below the lower frame and up behind as indicated by (A). Drain coolant fluid into a bucket.
- B. Remove main radiator lower mount bolts. The main radiator needs to move back towards the engine to gain additional room to remove the intercooler radiator. Remove both sides, lift the main radiator over posts, and set behind.
- C. Remove 4 bolts that secure supercharger intercooler radiator to main radiator plastic mounts. There are 4 small bolts with square nuts behind that will drop off — be careful not to lose these!
- D. Release upper hose on supercharger intercooler radiator, located on driver’s side next to the expansion tank. Additional coolant might leak out of the bottom hose.
- E. Remove supercharger intercooler radiator up (see arrow). Removed from the top, take care as this is a tight fit. With assistance, the A/C Condensor and main radiator will need to be temporarily pushed back to remove the supercharger intercooler radiator. Take your time maneuvering, it’s a tight fit.
Step 7 – Install supercharger intercooler radiator
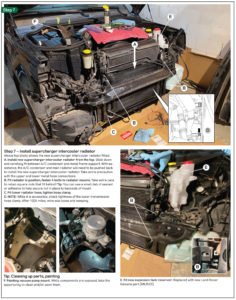
- A. Install new supercharger intercooler radiator from the top. Slide down and carefully fit between A/C Condensor and metal frame support. With assistance, the A/C Condensor and main radiator will need to be pushed back to install the new supercharger intercooler radiator. Take extra precautions with the upper and lower metal hose connections.
- B. Fit radiator in position, fasten 4 bolts to radiator mounts. Take extra care to retain square nuts that fit behind! Tip: You can use a small dab of sealant or adhesive to help secure nut in place to the backside of the mount.
- C. Fit lower radiator hose, tighten the hose clamp.
- D. NOTE: While it is accessible, check the tightness of the lower transmission hose clamp. After 100k miles, mine was loose and weeping.
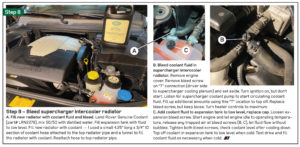
Step 8 – Bleed supercharger intercooler radiator
- A. Fill new radiator with coolant fluid and bleed. Land Rover Genuine Coolant (part# LRN2279), mix 50/50 with distilled water. Fill expansion tank with fluid to a low level. Fill new radiator with coolant — I used a small 4.25” long x 3/4” ID section of coolant hose attached to the top radiator pipe and a funnel to fill the radiator with coolant. Reattach hose to top radiator pipe.
- B. Bleed coolant fluid in supercharger intercooler radiator. Remove engine cover. Remove the bleed screw on the “T” connection (driver side to supercharger cooling plenum) and set it aside. Turn ignition on, but don’t start. Listen for the supercharger coolant pump to start circulating coolant fluid. Fill up additional amounts using this “T” location to top off. Replace bleed screw, but keep loose. Turn heater controls to maximum.
- C. Add coolant fluid to the expansion tank to the low level, replace the cap. Loosen expansion bleed screw. Start the engine and let the engine idle to operating temperature, release any trapped air at bleed screws (B, C), let fluid flow without bubbles. Tighten both bleed screws, check coolant level after cooling down. Top off the coolant in the expansion tank to the low level when cold. Test drive and fill coolant fluid as necessary when cold.
